Workflows
Overview
Workflows connect data between your users’ apps and your application
About Workflows
Once your users have connected their third-party app accounts, you can then connect data between your application and your users’ apps using Workflows. Workflows consist of Triggers and Actions, allowing for seamless automation and data flow between applications. With Workflows, users can easily implement common integration use cases such as pushing data from their application to users’ apps, receiving real-time updates through webhooks, and enabling non-technical teams to configure integrations without coding. Here are some examples of Workflows for popular integrations:Slack
Send notifications from your application to Slack channels.
Salesforce
Sync contacts from your application to Salesforce CRM.
HubSpot
Sync contacts between HubSpot and your application.
Google Calendar
Create events in Google Calendar based on events in your application.
Triggers
All workflows start with a trigger, which determines when the workflow will run and how data is passed into the workflow. Triggers are setup in theStart Node of workflow. Available workflow trigger types include:
App Events
App Events
App Events
App Events are custom events that are sent from your application via the Cobalt SDK or API to trigger Workflows.In general, App Events are useful for triggering workflows that map data from your application to your users’ apps. For example, you might send a Learn more about Events in our guide here.
Contact Created App Event from your application to trigger a Workflow that creates a matching contact in your users’ Salesforce CRM.An App Event can be used to trigger multiple workflows. This is useful in cases where you may want the same event to trigger similar workflows across different integrations.
Default App Triggers
Default App Triggers
Default App Triggers
Default App triggers can be used to run workflows based on events in your users’ apps. For example, you might want to trigger a workflow whenever new contacts
are created in your users’ Salesforce account, to sync contacts to your application in real-time.
Schedule Trigger
Schedule
Schedule
The Scheduler trigger is used for workflows that should run automatically at a scheduled time or interval.Once deployed, the workflow will run automatically at the designated time for all users who have activated the workflow.
- Minutes (e.g. every 30 minutes)
- Hourly (e.g. every hour at 15 minutes past the hour)
- Daily (e.g. every 2 days at 9:00 am)
The minimum time that can be set in scheduler should be greater than 5 minutes.
Workflow API
Workflow API
Workflow API
The Workflow API in Cobalt allows users to execute workflows programmatically instead of relying on event-based triggers. This API-based execution provides flexibility in triggering workflows directly through an API call.
Know more about Workflow API here.
Actions
Workflow actions helps you to create complex workflows. You can drag and drop them on the workflow canvas asnodes of a workflow, inter-connect
and configure them to achieve required flow. These actions can be broadly categorized as:
Cobalt’s Native actions
Cobalt's Native actions
Cobalt's Native actions
These actions do not make any API calls themselves but help as utility tools for making workflows.There are various utility nodes currently provided by Cobalt. You can learn more about any of the node by clicking on its card below.PDF
CSV/Excel by Cobalt
This node allows you to convert CSV to JSON, parse CSV to array or vice versa.
Custom Code
This action takes input parameters and uses them to manipulate the data using custom code.
Delay
Delay allows you to pause the execution of next step till a certain time.
File Handler
The File Handler Node allows you to perform operations on a file including transfer, download etc.
HTTP
HTTP Node allows you to create an HTTP Request to any API of the integration.
Internal Functions
This action is used to create re-usable functions or use pre-defined library functions in the workflow.
Loop
This action is used to loop over an entity or a flow for a number of iterations.
Merge
The Merge Node allows you to merge multiple branches of a workflow into a single flow.
PDF node helps you to convert HTML to a PDF.
Response
Response node lets you notify you about the Subscribed Webhook events and define the data that needs to be sent to you along with the notification.
Rule
You can add conditional logic to workflows using our rule node.
Send Email
Send Email node lets you send an email through the workflow.
Sub Flows
This node allows you to use another workflows within a workflow.
Tables
Tables node helps you create variables at runtime and add values to them.
Transform
This node lets you transform complex JSON into an easily accessible format.
Wait for Webhook
Pause the workflow execution until a webhook is received.
Cobalt’s custom actions
Cobalt's custom actions
Cobalt's custom actions
You can create API Proxies of your organization to use, in the Developer settings.
Third party application actions
Third party application actions
Third party application actions
Cobalt supports 100+ third party applications on its platform. Users can connect to these applications through Cobalt to make use of their APIs.When you select an application from the 
 Based on the API Requirements, you are also required to select the Time Format of the
Apps list to create a workflow, you can find it’s Native node in the right panel along with the other actions. Drag and drop it on the workflow canvas to make use of the the application’s APIs supported by Cobalt.HTTP Request
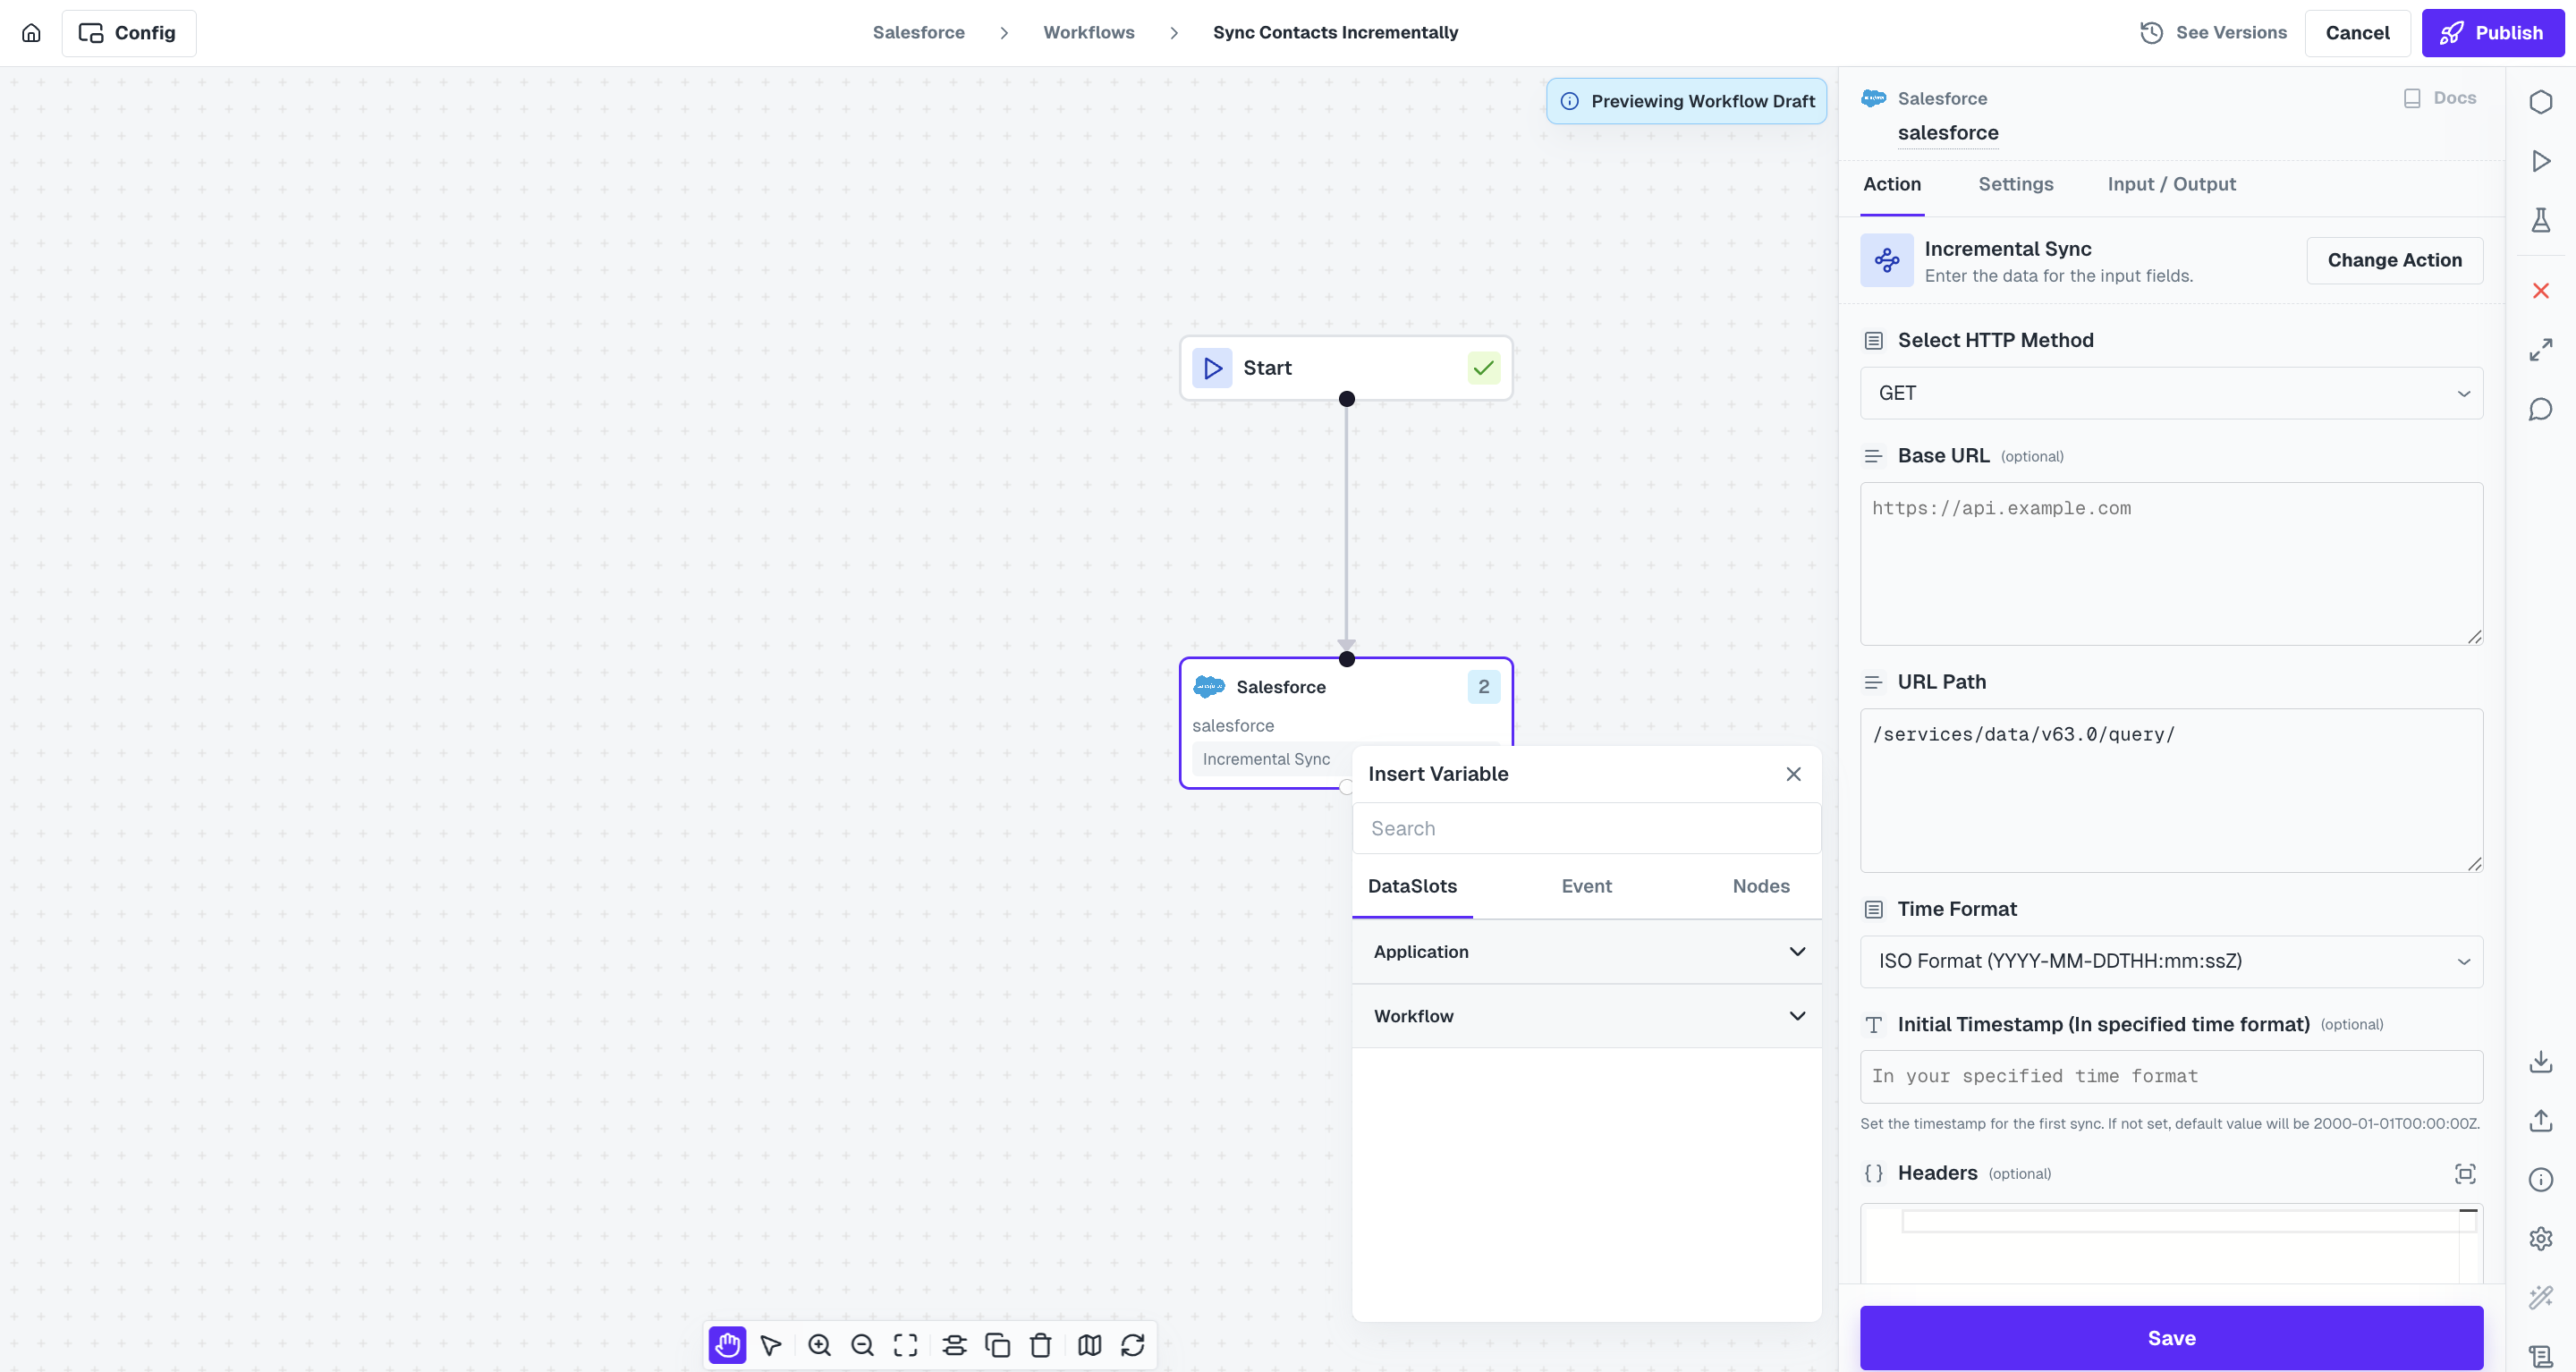
Users can also make any custom API call to the selected application that is not available with Cobalt as an action using the HTTP request. Simply setup the API in the node with all the required params likeMethod, URL, Request Body etc. and you are good to go.Incremental Sync action
Cobalt provides a default Incremental Sync action in all integrations. It lets you fetch new records added since the last sync, using a timestamp-based filter.How It Works
- Configure an HTTP request to the integration’s API to get the list of items of the required object.
- In the HTTP Request, also configure the timestamp filter based on the API’s requirement either in query params, headers or body, as required by the API of third party application.
- You can schedule the workflow using a Schedule trigger depending on the frequency you want to sync records.
Based on the API Requirements, you are also required to select the Time Format of the timestamp that will be used as templating for filtering records. Following formats are available:- ISO (
2025-04-17T10:30:00Z) - Unix (
1681726200) - RFC (
Thu, 17 Apr 2025 10:30:00 GMT)